Adding a Picklist to the Lightning Datatable
Though the built-in LWC Lightning Datatable component can expedite someone’s ability to edit and display rows of data, there is one major functionality missing: the ability to use a picklist. This is a functionality that is commonly desired within the Salesforce community. In this article, I will teach you how to add a picklist (and richtext) column type to a Lightning Datatable;
Code Snippets
The first step in adding a new type to a Lightning Datatable is creating an LWC that controls how the type is displayed and how it handles changes.
Creating the Picklist Type
This picklist column type will allow you to edit the picklist value inline.
datatablePicklist.html
<template>
<div class="picklist-container">
<lightning-combobox
name="picklist"
label={label}
value={value}
placeholder={placeholder}
options={options}
onchange={handleChange}
variant="label-hidden">
</lightning-combobox>
</div>
</template>
datatablePicklist.js
import { LightningElement, api } from 'lwc';
export default class DatatablePicklist extends LightningElement {
@api label;
@api placeholder;
@api options;
@api value;
@api context;
@api contextName;
@api fieldName;
handleChange(event) {
//show the selected value on UI
this.value = event.detail.value;
let draftValue = {};
draftValue[this.contextName] = typeof(this.context) == 'number' ? this.context.toString() : this.context;
draftValue[this.fieldName] = this.value;
let draftValues = [];
draftValues.push(draftValue);
//fire event to send context and selected value to the data table
this.dispatchEvent(new CustomEvent('cellchange', {
composed: true,
bubbles: true,
cancelable: true,
detail: {
draftValues: draftValues
}
}));
}
}
The context and contextName variables are used to identify which row the combobox belongs to. For example, the contextName might be 'Id' and the context variable would be set to the Id of the record for that row. When the datatable is used, the Id can be used to match the row the the even fired from the combobox.
Creating the RichText Type
This richtext type will not be editable inline, but will allow a user to display the formatted richtext in the datatable row.
datatableRichText.html
<template>
<lightning-formatted-rich-text
value={text}>
</lightning-formatted-rich-text>
</template>
datatableRichText.js
import { LightningElement,api } from 'lwc';
export default class DatatableRichText extends LightningElement {
@api text;
}
Extending the Datatable
The next step in extending a datatable’s functionality is creating an LWC that extends LightningDatatable. The html file for this LWC is simply an empty template, but the javascript file is as follows:
extendedDatatable.js
import LightningDatatable from 'lightning/datatable';
import picklistTemplate from './picklistTemplate.html';
import richtextTemplate from './richtextTemplate.html';
import { loadStyle } from 'lightning/platformResourceLoader';
import DataTableResource from '@salesforce/resourceUrl/CustomDataTable';
export default class ExtendedDatatable extends LightningDatatable {
static customTypes = {
picklist: {
template: picklistTemplate,
typeAttributes: ['options', 'label', 'value', 'placeholder', 'context', 'contextName', 'fieldName']
},
richtext: {
template: richtextTemplate,
typeAttributes: ['text']
}
};
constructor() {
super();
Promise.all([
loadStyle(this, DataTableResource),
]).then(() => {})
}
}
The customTypes object defines attributes that control the new types. These typeAttributes are used to pass values into the templates. You can remove one of the customTypes if you only with to implement one of either the picklist or richtext types.
As you can see, there are several files imported in the header of this class. The template files are saved under the extendedDatatable component and instantiate the LWC types that we created earlier.
picklistTemplate.html
<template>
<c-datatable-picklist
label={typeAttributes.label}
value={typeAttributes.value}
placeholder={typeAttributes.placeholder}
options={typeAttributes.options}
context={typeAttributes.context}
context-name={typeAttributes.contextName}
field-name={typeAttributes.fieldName}>
</c-datatable-picklist>
</template>
richtextTemplate.html
<template>
<c-datatable-rich-text
text={typeAttributes.text}>
</c-datatable-rich-text>
</template>
The imported custom resource is a custom CSS class used to format the picklist column. It is not necessary, but if you want the picklist row to look nice, you should include it. This must be implemented as a Static Resource and not a CSS file saved under the extendedDatatable LWC bundle.
CustomDataTable.css
.picklist-container,
.lookup-container{
width : 100%;
margin: spacingNone;
}
.picklist-container .slds-dropdown,
.lookup-container .slds-dropdown{
position: relative !important;
z-index: 99 !important;
overflow-y: scroll;
}
th.slds-has-focus, td.slds-has-focus{
box-shadow: none !important;
}
Example of Use
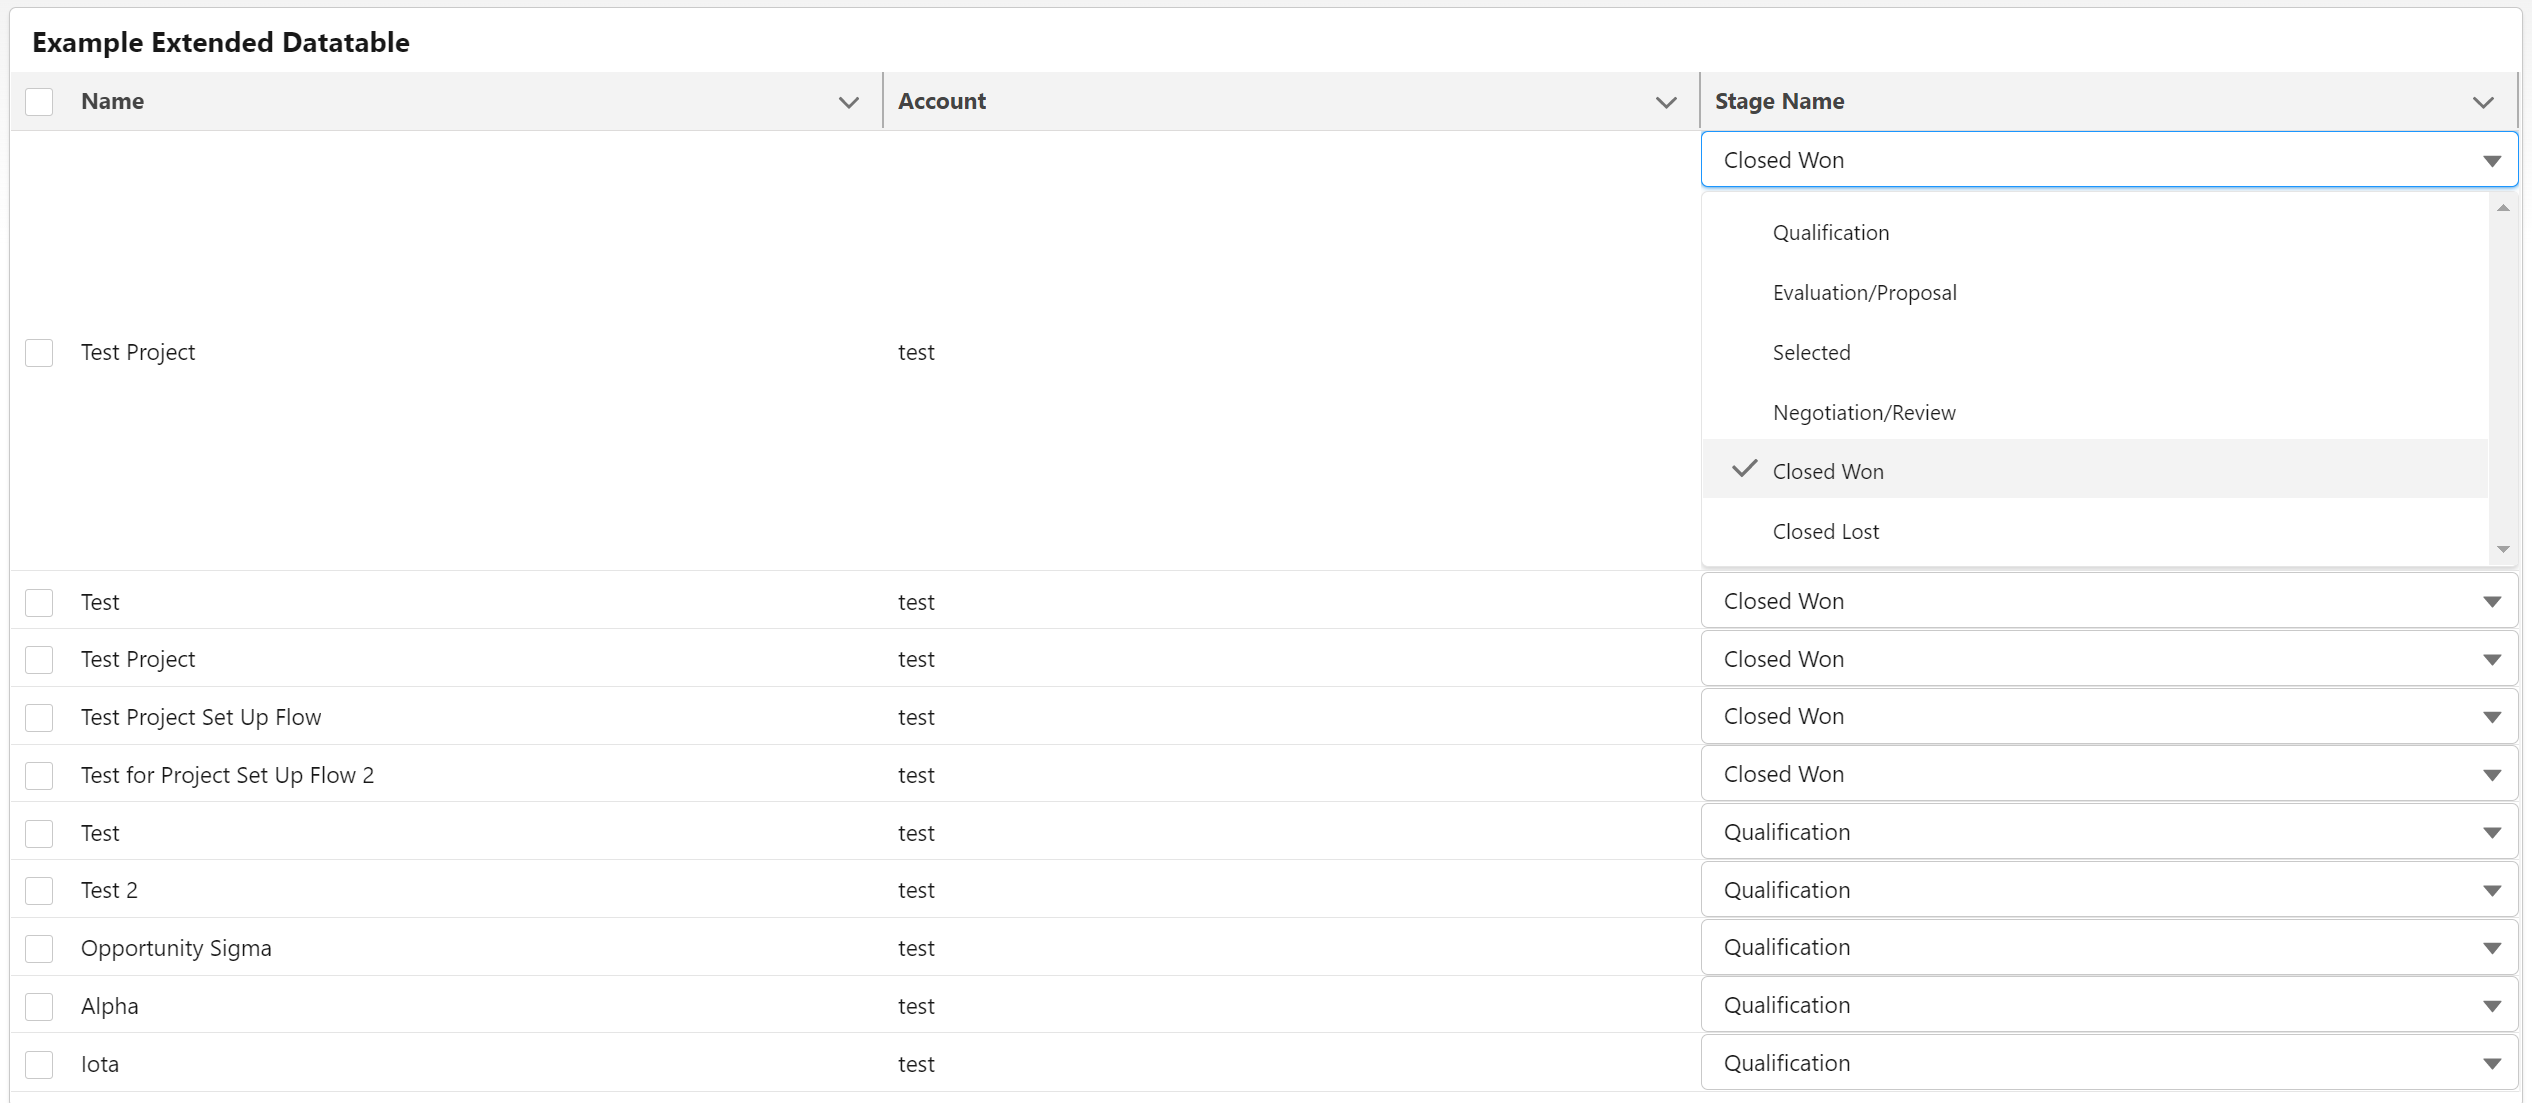
Here is an example of the datatable being used to display Opportunities. The row will expand when a picklist value is being selected, but will return to its normal size after selection. The code for this example is shown below.
exampleExtendedDatatable.html
<template> <lightning-card class="slds-var-p-around_small" title="Example Extended Datatable"> <template if:true={loading}> <lightning-spinner></lightning-spinner> </template> <template if:false={loading}> <c-extended-datatable key-field="id" data={data} columns={columns} draft-values={draftValues} oncellchange={handleCellChange}> </c-extended-datatable> </template> </lightning-card> </template>exampleExtendedDatatable.js
import { LightningElement, wire } from 'lwc';import getOpportunities from '@salesforce/apex/ExampleExtendedDatatable_Controller.getOpportunities';
export default class ExampleExtendedDatatable extends LightningElement { loading; data; options = [ { label: 'Qualification', value: 'Qualification' }, { label: 'Evaluation/Proposal', value: 'Evaluation/Proposal' }, { label: 'Selected', value: 'Selected' }, { label: 'Negotiation/Review', value: 'Negotiation/Review' }, { label: 'Closed Won', value: 'Closed Won' }, { label: 'Closed Lost', value: 'Closed Lost' } ] columns = [ { label: 'Name', fieldName: 'Name' }, { label: 'Account', fieldName: 'AccountName' }, { label: 'Stage Name', fieldName: 'StageName', type: 'picklist', typeAttributes: { label: 'Stage Name', value: { fieldName: 'StageName' }, fieldName: 'StageName', placeholder: 'Select Stage', options: this.options, context: { fieldName: 'Id' }, contextName: 'Id' } } ] draftValues;
connectedCallback() { this.draftValues = []; }
@wire(getOpportunities) getOpps({data, error}) { this.loading = true; if (data) { let tempData = JSON.parse(JSON.stringify(data)); for (let i = 0; i < tempData.length; i++) { tempData[i].AccountName = tempData[i].Account.Name; } this.data = tempData; this.loading = false; } else if (error) { console.log(JSON.parse(JSON.stringify(error))); } }
handleCellChange(event) { this.loading = true; let draftValue = event.detail.draftValues[0]; console.log(draftValue);
let tempValues = JSON.parse(JSON.stringify(this.draftValues));
if (tempValues.length > 0) { for (let i = 0; i < tempValues.length; i++) { if (tempValues[i].Id == draftValue.Id) { tempValues[i] = Object.assign(tempValues[i], draftValue); } } } else { tempValues.push(draftValue); } this.draftValues = tempValues; this.loading = false; }Final Considerations
- DraftValues will need to be manually stored in order for changes to be saved.
- If you are going to edit other columns in the table, you will need to handle those changes differently than the picklist changes. The draftValues returned from a cell change of a standard column type will not include the changes from the picklist.
- To save changes, you will need to create a method in Apex.
- The options for the picklist should be retrieved dynamically, but must follow the format shown above in order to let the combobox work properly.
If you have any questions on this or another Salesforce topic, please use our form on our "Contact Us" page and our team would love to assist you.
2 comments


I am creating a data table similat to workbench data upload option. Where when you upload the CSV you get mapping table with three columns -
1. Column header from the file
2. picklist of Field to be mapped
3. Picklist of referece value for that field
Now I created a column where I am showing all the fields avaible for tha object, which is 2nd column, As soon as I change the mapped field, I want to change the reference value as well. Can I send multiple context for one picklist
Thank you for the content! I'm trying to implement but quem I click in the combobox the size of the line just increase and doesn't show nothing.. what I'm doing wrong?